|
Secret Missions 2
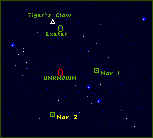
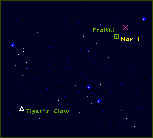
FIREKKA SYSTEM
Firekka 1
|
Primary Objectives
|
Escort TCS Perez de Cuellar to Nav 2
Eliminate hostiles
|
|
Your Ship
|
Hornet
|
|
Wingman
|
Iceman
|
|
Other Friendly Ships
|
TCS Perez de Cuellar
|
|
Briefing
|
You'll fly a Hornet---a fast, maneuverable ship. Escort the TCS Perez de Cuellar from the Claw to Nav 2. From there, the Diplomatic Corps ship will mini-jump to Firekka. We've detected traces of high energy on the direct route to Nav 2. After the Perez de Cuellar jumps to Firekka, investigate the unknown bogey between Nav 2 and the Tiger's Claw. Remember, if you run into one or two stray Kilrathi, you should engage the enemy. But if you see any sign that the convoy has diverted to this system, return to the Claw immediately. And HQ has reported encounters with the Dralthi Mark IIs in the Vega Sector -- Dralthi with mass drivers and better shields. HQ could use some good vidcamera data on these new ships.
|
NAV 1
4 Dralthi
NAV 2
4 Salthi
BETWEEN NAV 2 AND CLAW
Wave 1
4 Gratha
1 Ralari
Wave 2
4 Krant
|
|
Notes
- Escorting the Venture shouldn't be too much trouble although taking out those fighters with a pair of lasers isn't exactly fair odds. After Thor's Hammer you shouldn't need any advice on how to handle them though. The force between Nav 2 and the Claw is the real problem. You'll have pretty much no chance of taking out the Ralari before it jumps due to the large number of escorts - some of which are being flown by Kilrathi Imperial Guard (Drakhai) pilots. Since you're only in a Hornet, I would advise just hitting your afterburners and heading for the Claw as quickly as possible.
Outcome
Success / Failure go to Firekka 2.
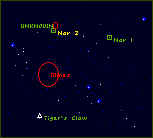
Firekka 2
|
Primary Objectives
|
Patrol the area
|
|
Your Ship
|
Hornet
|
|
Wingman
|
Iceman
|
|
Other Friendly Ships
|
None
|
|
Briefing
|
You'll patrol through the asteroid fields to Nav 1. Continue through Nav point 2, then return here.
|
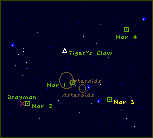
BETWEEN CLAW AND NAV 1
4 Dralthi
NAV 1
4 Krant
NAV 2
9 Jalthi
3 Fralthi
|
|
Notes
- Once again, you shouldn't need any advice on how to handle fighters so the two wings before Nav 2 shouldn't be a problem for you. As in the last mission, the large force is too much to contend with so hit your afterburners and head for home, although be careful since you'll have to fly through a mine field.
Outcome
Success / Failure go to Firekka 3.
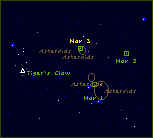
Firekka 3
|
Primary Objectives
|
Patrol the area
|
|
Your Ship
|
Rapier
|
|
Wingman
|
Knight
|
|
Other Friendly Ships
|
None
|
|
Briefing
|
You will follow your programmed navcomp course. Patrol through Nav One and continue through the asteroids to Nav 2 and 3. Avoid overwhelming opposition, but engage the enemy if you can. Then return to the Tiger's Claw.
|
NAV 1
Asteroid Field
3 Krant
NAV 2
3 Hhriss
1 Snakeir
NAV 3
Asteroid Field
Wave 1
3 Gratha
Wave 2
3 Krant
|
|
Notes
- For this mission they've given you something with a bit more power than a Hornet... one of the nice new Rapiers. There aren't any particularly difficult battles in this mission, but Nav 2 should be of interest to you. There you will face a new type of fighter and a new type of carrier.
Outcome
Success / Failure go to Firekka 4.
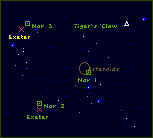
Firekka 4
|
Primary Objectives
|
Defend diplomat ships
|
|
Your Ship
|
Rapier
|
|
Wingman
|
Knight
|
|
Other Friendly Ships
|
TCS U Thant, TCS Trygvie Lie
|
|
Briefing
|
Fly directly to your rendezvous points with the Diplomatic Corps ships. Your top priority is those diplomatic ships. You'll protect the TCS U Thant as it jumps out at Nav 2 and the TCS Trygvie Lie as it mini-jumps at Nav 3. If you're attacked by any Kilrathi, return fire and destroy them. Once we have the Diplomatic Corps officers safe, we'll consider our other options.
|
NAV 1
Asteroid Field
3 Jalthi
NAV 2
4 Krant
NAV 3
Wave 1
4 Dralthi
Wave 2
4 Salthi
|
|
Notes
- Again there is nothing too challenging here. The Ventures will jump before the Kilrathi have a chance to do too much damage so you just need to worry about keeping yourself alive.
Outcome
Success go to Firekka 5. Failure you lose.
Firekka 5
|
Primary Objectives
|
Escort defecting Fralthi to Claw
|
|
Your Ship
|
Raptor
|
|
Wingman
|
Spirit
|
|
Other Friendly Ships
|
Fralthi at Nav 1
|
|
Briefing
|
Head to the rendezvous point at Nav 1 checking your route for enemy fighters. The Kilrathi don't know that Ralgha is defecting but we can't take any chances. You'll meet the Fralthi at Nav 1, and escort him home.
|
BETWEEN CLAW AND NAV 1
2 Hhriss
NAV 1
6 Krant
1 Fralthi
BETWEEN NAV 1 AND CLAW
4 Dralthi
|
|
Notes
- Finally a challenge. At Nav 1, you have to do all you can to keep the friendly Fralthi alive. There is also an enemy Fralthi in the area so be careful which one you shoot at. When you arrive, head straight for the friendly Fralthi and target a Krant which is attacking it. Use full guns and missiles to get quick kills, and always go for Krants attacking the Fralthi. The rest will attack you, but you'll have to ignore them if the Fralthi is to survive. When the Krants are gone, take on the enemy Fralthi.
Outcome
Success / Failure go to Firekka 6.
Firekka 6
|
Primary Objectives
|
Protect Drayman
Protect TCS Austin
|
|
Your Ship
|
Raptor
|
|
Wingman
|
Spirit
|
|
Other Friendly Ships
|
None
|
|
Briefing
|
We've detected several Firekka evacuation transports leaving the system, led by Captain Larrhi. One transport is headed for the jump point at Nav 3. Protect that ship. And then patrol the rest of your Nav points for enemy ships.
|
NAV 1
Asteroid Field
2 Jalthi
NAV 2
Wave 1
3 Krant
Wave 2
4 Dralthi
NAV 3
4 Salthi
BETWEEN NAV 3 AND 4
4 Gratha
|
|
Notes
- Another defense mission... things are hotting up. Nav 1 is a simple enough, Nav 2 however is a different matter. As you drop out of autopilot, afterburn straight towards the Drayman and take on the Krant nearest to it. Using full guns and missiles take out the Krant wing, then the Dralthis as quickly as you can. You'll need to be accurate with your guns since it doesn't take long for the Drayman to get destroyed. The attacking Salthi at Nav 3 aren't too much bother since they soon crumble under your guns and they worry more about attacking you. The TCS Austin is under attack by 4 Grathas, but it will jump out before it gets hurt so that is also nothing to worry about.
Outcome
Success go to Corsair 1. Failure you lose.
Comment on a mission
Submitted by : Guardian
Mission : Firekka 1
Comments : There are only 3 Gratha escorting the Ralari, all of whom are Imperial Guard. The second wave of 4 Krants are all Imperial Guard as well. Also, you are escorting an Exeter, not a Venture (though the nav log lists it as a Venture).
Submitted by : Delance
Mission : Firekka 2
Comments : It's cool when you destroy the 3 fralthi with the Hornets. There's lots of jalthi, so be careful. It's a nice challenge, and Iceman is a good wingman. If you win, Halcyon isn't pleased at all on the debriefing!
Submitted by : Patrick Colin Jackson
Mission : Firekka 5
Comments : This is as far as I've ever gotten with said game. Most annoying for me was that the Fralthi you're supposed to protect mysteriously blows up...even after you've taken out all the "bandits"! Could I have been doing something wrong...?
Submitted by : Bonkus Maximus
Mission : Who needs Iceman?
Comments : now the easiest, but the Col. shouldn't be that pissed...the Jalthi move almost as fast as Ralaris, so you can easily stop them.
Submitted by : Kurtz
Mission : Firekka 5
Comments : @Patrick:
That occurred to me as well. Basically, as you meet with the Fralthi, it heads to the Tiger's Claw and will not follow you to Nav 1, though you may not have visited it yet. Just manually set your nav point to the Claw and follow the ship
Submitted by : Star Fox
Mission : 5
Comments : Head for NAV 1, blast the two badies, go on. NAV 1: blast the krants then take out the enemy cap ship. Use NAV computer, manualy set course for Tiger's Claw. Afterburn past the Dralthis on the way back home, as your escort can handle them itself
Submitted by : Doom
Mission : Firekka 6
Comments : N2 is a pain. The one time I wiped out both Krant and Dralthi waves before they dusted the escort, Spirit gets herself killed at N4! I only got through by redding-out the last Krant so he ran. Go N2, N3, N4 then N1 to save pointless reloads.
Submitted by : Vapor
Mission : Firekka 6
Comments : Interesting trick: Go to N2, then N1. The Drayman will go straight to N3 and jump out while you're fighting the Hhriss. Go to N3 and there are just 2 Salthi instead of 4. Finally, go to N4.
Submitted by : Rovlad
Mission : All
Comments : Put this in SM2 Game Notes please:
If the enemy strike wing has Drakhai on it, their destruction often sends the rest of the cats into withdrawal, even those attacking Tiger's Claw or your escorted ship. Capships escorts don't retreat though.
Submitted by : Dralthi
Mission : Firekka #1
Comments : Bronze Star is possible in mission #1, even if TCS Perez de Cuellar was not escorted to a jump point.
Submitted by : Drifter
Mission : Firekka 2
Comments : There is a second wave of Dralthi (flown by Imp guards) after you clear out the six shooters.
Submitted by : Dr. C.L. Kohl
Date : Sat Feb 4 15:40:46 2012
Mission : Firekka 3
Comments : Silver medal for 13 kills.
Submitted by : GBOOM
Date : Fri May 31 04:36:24 2013
Mission : Firekka 2
Comments : Not really sure what happened, a I was fleeing from the 9 Jalthis and 3 Fralthis, I looked back (F4) to see if they were chasing me. When I did, they all promptly exploded. I even went back to Nav 2 to verify. Two Jalthis survived whatever is was, but all the Fralthis and 7 of the Jalthis were dead. Interesting. Anyone else have this happen? Halcyon dressed me down a bit for it...
|
