Episode 5 - Winning Mission 11 - First Encounters
| First Encounters | |
|---|---|
| Date | 2668.365.1420 |
| Fighter | Stiletto |
| Wingmen | Trigger and Lynx |
| Other Friendly Ships | 2 wings of Rapiers (flown by techs) at the Kipling |
| Objectives |
|
| Previous | Episode 4 - Losing Mission 10A - A Monster of Myth Episode 4 - Winning Mission 10A - Tactical Withdrawal |
| Next | Episode 5 - Winning Mission 12 - Wild Weasel |
Preflight Conversations
Cougar: Well? What do you have to say for yourself?
Bradshaw: [sighs] I'm sorry about grounding you like that. It was unfair.
Cougar: Good grief Captain, I don't care that you grounded me, I got over it. But risking yourself like that? The last thing this fighter wing needs is a dead Wing Commander.
Bradshaw: What do you expect me to say, Cougar? I lost one of my closest friends, I think I was entitled to be pissed.
Cougar: Look, we're really sorry about Spoons, we know how you feel. But that doesn't make it right for you to get all suicidal like that. I don't care if you were trying to get revenge or if you were trying get yourself killed, you just can't fly when you're in a state of mind like that.
Bradshaw: I know. I'm sorry, Cougar. I won't let it happen again.
Cougar: Well, I guess we're even now I suppose. Just try not to get yourself killed, alright?
Bradshaw: Yeah. You too.
Briefing
Reismann: Captain, before we begin...I know many of Tolwyn's officers thought pilots from a backwater like Gemini couldn't handle a real fleet action. Your boys proved them all wrong, and I'm mighty proud of you.
Bradshaw: Thank you, Commodore, but I do not think this battle is over yet.
Reismann: No indeed, the hard part is just beginning. Well, then... You're looking at the TCS Kipling, one of the Bengal-class strike carriers. She's out of comission - there is no way to get her running in time for this battle. She does, however, still have a number of fighters onboard... and we're going to take them to refill your wing. The bad news is, she doesn't have any trained pilots. Those fighters will be ferried across by techs. So you'll head to the Kipling, and escort those ships back here. Be careful - in a firefight, those fighters will not be able to defend themselves.
Bradshaw: Understood, sir, we'll protect them.
Reismann: Hold on, Captain, there's more. The cats lost a lot of ships in Sirius, and we need to size up their remaining fleet to work out how best to hit them. So all along the line, we're sending wings out to inspect the Kilrathi ships. Your wing will target this area here. Preliminary scans indicate this group consists of lighter capships, from cruisers down to frigates and destroyers. Your job is to confirm that. Just fly there, take a quick look, and get out. Don't even try to dogfight the escort fighters - we need you back alive. Good luck out there.
Mission Layout
- Intercept Nav
- 8 Sartha
- 3 Drakhai Vatari heavy fighter (after 40 seconds)
- 1 Vatari ace Sah'tra Fireblade (after 40 seconds)
- Target Area Nav
Player Notes
One engagement and one reconaissance pass (you shouldn't really fire any shots in the latter so it's hardly an engagement). Both are hard.
You pick the Kipling's Rapiers up without incident, but on the way back to the Firekka your forces are intercepted by two wings of Sartha. You have about 40 seconds before these Sartha are reinforced by four Vatari superheavy fighters. The Vatari is an extremely powerful fighter armed with quad particle cannons, two mass drivers, and very strong shields that regenerate almost as quickly as a Stiletto can knock them down. It almost goes without saying that you don't really want to fight the Vatari.
Fortunately, you don't have to - well, not seriously anyway. The Vatari wing will retreat if you damage the ace by an amount which roughly correlates to an HS missile into the rear armour (don't hit him with a second one, or the three surviving Vatari will all try and kill you, specifically. If you can manage to defeat them, you don't need this guide to help you.) This you should do as soon as possible, because a Vatari has a lot more firepower than the Sartha so you'll lose more fighters if they stick around. Before and after their intervention, you might as well use your other three missiles on the Sartha because there are no other engagements and the quicker you kill them the more Rapiers will survive (very rarely, the Rapiers will get a kill). Sartha are annoyingly hard to kill in a Stiletto because you lack firepower and HS missiles are still terrible - going back to it really makes you realise how spoiled you were in the Rapier.
You need to come back from the fight with less than 40% core damage, or the mission is automatically a failure.
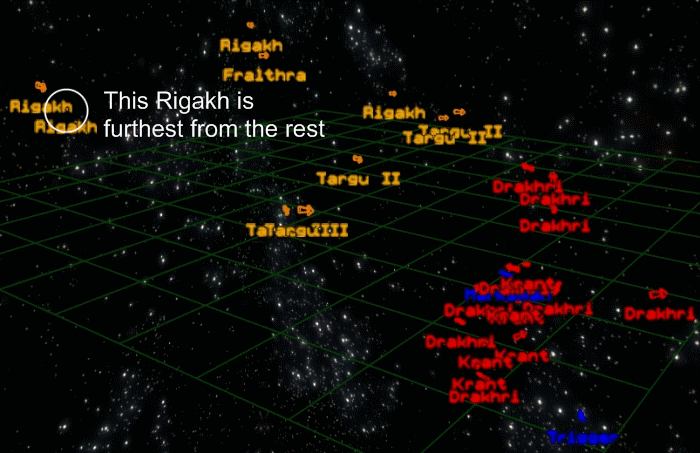
The target area nav contains a huge number of Kilrathi ships. Don't bother engaging any of them, just head straight for a Rigakh to scan it. Which one? Hit Alt-N and check the map. You'll find one of them is too close to the frigates and another would leave you in the shadow of the Fralthra cruiser. Of the other two, the one circled in the screenshot is probably the best bet. Then you'll have to duck and weave while remaining within 5,000 km for 45 seconds to complete the objective, before standing on the afterburners and fleeing - don't even think about trying to fight the enemy ships here. It'll usually take somewhere between half to two-thirds of a tank of fuel before the autopilot light turns on.
