Theta Wing (Firekka System)
| Theta Wing | |
|---|---|

| |
| Fighter | Dralthi |
| Wingmen | Etienne Montclair |
| Previous | Psi Wing (Firekka System) |
| Next | Sigma Wing (Corsair System) |
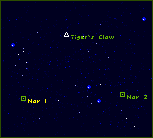
Mission Layout
- Between the Tiger's Claw and Nav 1
- 5 Gratha
- Nav 1
- 5 [[Hhriss]
- Nav 2
- 3 Jalthi
- Between Nav 2 and the Tiger's Claw
- 3 Krant
Images
The Memoirs of Lieutenant Colonel Carl T. LaFong
We had received word that one of our Draymans, the TCS General Powell, had never arrived at its rendezvous point. Soon after, an emergency communication indicated that it had been overrun by the Kilrathi, but that officers were trying to retake the ship.
Mission Profile:
Flying Dralthi, Doomsday and I were ordered to assist the Dray-man and escort her back to the carrier.
Mission Chronology:
1. Four Drakhai flying Krant appeared when we were 72,916 km from Nav 1. They didn't attack our wing of Dralthi.
2. Four Drakhai in Hhriss were found attacking the Drayman at Nav 1. During our dogfight, the Drayman jumped to Nav 2.
3. Three Jalthi were discovered heading for the Drayman when we were 19,810 km from Nav 2.
4. Three Krant attacked as we brought the Drayman to the carrier.
Post Mission Analysis:
We kept radio silence and sneaked right by the four Krant who appeared soon after we left the carrier.
Against the Drakhai pilots in the Hhriss, we were lucky that the Drayman jumped during the dogfight. I'm not sure we could have saved her from the heavy enemy fighters. Without worrying about the transport, though, we fought defensively, using constant slides to avoid their fire, and using our maneuverability to gain position and hit quickly with our lasers.
We expended our missiles and voices against the Jalthi. We used our speed advantage after taunting the pilots to keep them away from the Drayman. I ordered Doomsday to attack my tar-get to take out the first JAW, then switched to break and attack.