Gwynedd System - Series 1 - Mission 1
| Gwynedd System - Series 1 - Mission 1 | |
|---|---|

| |
| Fighter | Ferret |
| Wingmen | Elizabeth Norwood |
| Previous | The Secret Missions 2: Operation Crusade: Upsilon Wing (Charon System - Border Zone) Previous LaFong Entry: |
| Next | Gwynedd System - Series 1 - Mission 2 |
Mission Layout
Images
The Memoirs of Lieutenant Colonel Carl T. LaFong
Previous LaFong Entry:
New Kilrathi Ship and Pilot Tactics
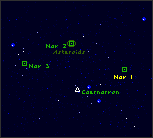
Captain "Shadow" Norwood and I headed out for our required monthly patrol around Caernarvon Station. Since we hadn't seen an enemy fighter in 10 years, we weren't expecting trouble.
We were flying Ferrets, light and quick little ships with a top speed of 500 KPS. Armed only with mass drivers, the ships weren't designed for heavy dogfighting, but were perfect for our short-range patrol work.
I couldn't believe it when Shadow's shrill voice announced the appearance of enemy ships. We hadn't even reached Nav 1 yet, and three Sartha were headed our way! I knew we carried more armor than the Sartha, but our mass drivers were weaker than their neutron guns. It was a pretty even match-up, except we carried a 100 KPS speed advantage at maximum velocity.
I ordered her to break and attack, then broke hard to the left and pinned the throttles on full. I lit the afterburners, circled back to the right, and came around behind two of the Sartha. One tried to turn away, but I was right there, and sent him tumbling with just two shots to his left side. Shadow yelled that she'd downed a ship, so I ordered her to attack my target and we went after the last Sartha in the wing. It was quick and painless with two against one.
I'd settled down enough by the time we reached Nav 2 to make it through the asteroids, but the juices started pumping again when three Drakhri showed up near Nav 3. I signaled Shadow to break and attack, and rolled right to present a low profile against the three lasers on the medium fighters. They had an advantage at long range, but our mass drivers were devastating in close, so that's where we stayed. With our speed, we crowded them at every turn and re-leased three shot volleys at our targets to record our kills.
The comm officer thought I'd gone mad when I radioed our report before landing at the station. Actually, it felt great to be back in the cockpit.
Author's Note
The following profiles represent the actual missions I flew in the successful campaign against the Kilrathi in Enigma Sector. Game players will note that these missions correspond to the series numbered 1 through 8 in the mission map on page 216 of this book. The profiles for missions on the losing paths in the game are found at the end of this section.