Beta Wing (Firekka System)
| Beta Wing | |
|---|---|

| |
| Fighter | Raptor |
| Wingmen | Mariko Tanaka |
| Previous | Omicron Wing (Firekka System) |
| Next | Beta Wing (Corsair System) |
Mission Layout
Images
The Memoirs of Lieutenant Colonel Carl T. LaFong
Two more enemy battle fleets were on the way to Firekka. After receiving a vid-link from Kilrathi Prince Thrakhath, we had some understanding of the situation. His message indicated that we were trespassing on the holy ground of Lord Sivar, the Kilrathi war god. He gave us one planetary rotation to leave. Command ordered us to retreat to a nearby star system, hoping the Kilrathi would think we had abandoned the area.
Mission Profile:
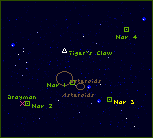
Beta Wing - Spirit and I in Raptors - was ordered to escort a Drayman, part of the evacuation fleet, to its jump point at Nav 3. Other wings would help clear a path for the carrier's move to the Corsair System.
Mission Chronology:
1. Two Jalthi, one piloted by a Drakhai, attacked in the asteroid field 19,819 kilometers from Nav 1.
2. Three Krant attacked 19,701 kilometers from Nav 2.
3. Four Dralthi attacked the Drayman at Nav 2.
4. Two wings of Salthi attacked 5670 kilometers from Nav 3.
5. Four Gratha attacked the TCS Aus-tin 67,713 kilometers from Nav 4.
Post-Mission Analysis:
After we picked off the first Jalthi with full guns, the Drakhai pilot retreated. Taunts, full guns, and afterburner slides kept us and the Drayman alive against the three Krant, four Salthi, and four Dralthi who attacked. The big surprise came when we ran into the TCS Austin.
We hit full afterburners as soon as we noticed the large ship was under attack, and began taunting each enemy ship. We used our neutrons to hit their shields, then used our javelins and Spiculums to pierce their armor.