Arrow 3D model

There are one or two details that still need to be added, after that I’ll start texturing.

As for render times, well my machine is not exactly a very modern one. It’s a P3 800 MHz with 256 MB RAM and a GeForce 2 with 64 MB. As you can see processing power is something I don’t have, so render times should be long in my case.
 
Well, then I suggest you do most of the smaller details with textureing, if you want to make an animation with it! Getting a VRay renderer plugin (or Brasil) will help your rendering times a lot too, and while makeing muh more impressive renders than default scanline! Videocard is only used for teh real time part, dureing rendering its the CPU that does teh work. Oh, and don't forget to turn your textures into jpg! TGAs and BMPs can eat lots of memory while they don't have any effect on the result.
 
If you use Max I would suggest that you take a look at how to work with metalray. Even is Brazil has a lot to offer its not for free as far as I know. Mentalray is part of Max.

For using TGA/BMP or other formats...well that depends on quality and size.
If you have a quite small (in terms of memory) then you can use TGAs without a problem. For realy big files I would suggest PNG format. It has a good quality, supprts alpha channel and still has an good size.
In general its what quality you are aiming for. In animation you can mostly do it with textures with a little lower quality. In a still people can find errors more easly...since they have the time to look at them ^_^

For my experiance CGI for the normal person that dosn't want to spend days with rendering a single frame its all about faking as much as you can and still make everyone belive that you use highres stuff.
 
"It doesn't have to BE right, it has to LOOK right" as someone once said, and he was right!
Now, MentalRay is
1: NOT FREE EITHER,
2: NOT PART OF MAX 1,2,3,4 or 5.
3: It's damn hard to use and set up properly to get a good results, and last, its the slowest of the three. If I were you, I would deffinetly get a free version of VRay, which can be downloaded from their site. Why? Cause thats the most simple to use, and gives the best results with the least knowladge and errors.

TGA and BMP are nice if you got lots of RAM, but you don't, and you can get fairly good JPG's, just don't use PhotoShop to compresse them,, that alwas makes a mess of it. Use Irfan View, its free, and has a simple and greate jpg converter built in, and handles all common types of images, you won't have to wait for PS to load.
There is no visible difference in the result, unless you render something as big as 2048* and larger. Maps the size of 512*512 should be enough too, bigger means lots of more work, even if it has smoother lines and such. (well, come to think of I use 1024*1024 usually, then cut off the unneeded parts, than do the mapping with it)

As for PNG, and Alpha maps, 3Dmax simply doesn't use it :) It's usefull in games and such, but in max u work with separate maps for that. Even if Max could handle it, you won't be useing it, if you want to make quality work. If you need an alpha map of an existing map, you'll probably need to trim it to your needs anyway, and so you'll and up with a separate map in the end.
 
That latest one looks way better! You shouldn't use other fan creations as reference, or you'll risk making the same mistakes as them.
 
zohrath_1 said:
That latest one looks way better! You shouldn't use other fan creations as reference, or you'll risk making the same mistakes as them.
It’s true, I have used your model as reference for those last details (I hope you don’t mind), and I know that the original model hasn’t it like the way you did. The reason that made me do it like that is because I didn’t knew how to make it the way it should. And your idea works fine, in my opinion. You can see in the pictures below that I have added new details that do not correspond to the original model either.


Next for the model is texturing.
 

Attachments

  • wip4_01.jpg
    wip4_01.jpg
    71.7 KB · Views: 259
  • wip4_02.jpg
    wip4_02.jpg
    75.2 KB · Views: 246
Looks allright to me :D I don't know if you did that on porpous, but on some round surfaces, the "smoothing groups" are not in order, so it doesn't look smooth. Like on the bottom of the underside wings.
 
Yes, I did it on purpose. Do you think I should round it?
I have started texturing and I’m getting a hard time in “connecting” the upper side texture’s lines (markings) with the underneath ones.
 
nope, don't round it, it looks better this way. Yep thats a usual problem with textureing. I dunno how you should do it. there are multiple ways, but none of em is perfect. jsut do it as you can, and don't give up! :D
 
Give up? No way, I have a few ideas for this model and now that I’ve got this far there’s no stopping. :D But be patient, because the amount of time I can dedicate to this is not much.

P.S. – Did you get my mail?
 
This post is just to keep the thread alive and to say that I’ve been working on the textures. As soon as there’s visible progress I’ll post it here.
 
Ok, here is the model, finally. It’s not perfect, actually it has a lot of “problems” in its textures, but for now I’ll consider it finished. In the future, when I learn more on the subject, perhaps I’ll try to make new and better textures.
Feel free to criticize and suggest.
Hope you like it. :)
 

Attachments

  • Arrow_02.jpg
    Arrow_02.jpg
    95.5 KB · Views: 232
  • Arrow_01.jpg
    Arrow_01.jpg
    66.7 KB · Views: 223
Gotta tell u, that for a first textureing, this looks amazeing! Well done! I once worked on a longbow modell (modified the very low poly-nodetail ingame modell of it), but could never texture it! Great work! I got some ideas how to improve, try to do some of them if you have time.

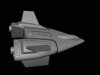
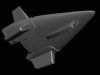
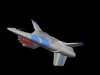
First, I would add a bump map. Even adding the original map u used works (seen the arrow I posted here, it has the same map for diffuse and bump), but thats a bad solution. If you made the texture useing an object/layer based software like PS, then I hope you still got the separate layers. The thing you should do is place the panel lines on a totally white layer, the image the same sized as your diffuse map of cours. Save it as anything, then ut it into the bump slot of the material. Next, add some specularity level to it, or the bump wont show. Leave glossines around 15. That should be a nice a metal.

Second thing you can do, is add "detail" to your diffuse map. add some fine dust, rust, scratches even.
I know an arrow shouldn't rust in space, but hey, that makes it look more "realistic" for the crowds :D . You may also create a separate map for specularity level. That should be made from the new "dust layer", on a white sheet. This will make the light only gloss on the white places, so where theres no dust. Tip: convert the dust layer into something very dark grey. The specular map only uses grayscale value, so "color" doesn't matter there. BUT a nice rustbrown only onverts into something middle/light-gray. That would make the light gloos even there, just less. We don't want this, we want it Not to gloss at all!
It should also have the same pixel ratio as the original diffuse texture.
This is to ensure that every texture is in the same place without doing anything to them.

I'm not totally sure, but I think you don't need to have the same pixel-sized texture, jsut the ratio should be the same. Anyone know? Thanx.

So, I hope this will help a bit. If you'r really fed up with it though, I would be more than happy to practice dusting your texture for you :D

BTW, no point in turning a a texture into .jpg if you have the hard disk space to store larger formats. Why? cause before actuall rendering, the texture must be converted back into a the pixel based format.
 
Like lorddarthvik said, you should add a bump map, dirty up the diffuse map and get some specular mapping on the ship. The model itself looks pretty solid, although there are still edges that could use some smoothing. And for some reason, the pic doesn't show for me, although I can click on some invisible link in your post. Got any more views other than the one?
 
First of all thanks lorddarthvik and zohrath for your comments and suggestions.

Now in order of appearance. :)

@lorddarthvik

This is not my first texture; the first one was the Strakha’s. That was much worst than this one.
I will try your suggestions, some now (the easier ones :)) and later the rest. But I must say that some of the things you mentioned I don’t know what they are (therefore I’ll investigate at due time). You know, my scholar and professional formation are not in this field, so everything you see here is the result of tutorials from 3dsMax and the Web and of course from your and Zohrath’s help. (Which leads me to the question in the bottom of this post *.)

As soon as I can I’ll send you my texture so that you can practice dusting. :D
--------------------------------
@zohrath

I’ve added some more pics that I have here, some I had to zip in order to respect the maximum file size (please rename the file extension to ZIP). Hope it works for you now.
--------------------------------

I have made two wallpapers with this model and the Strakha, eventually they should be available for everybody. I have tried a few new things. :)

I have said this to lorddarthvik already and now I say it to everybody, if someone wishes to use my models in a project feel free to ask and I’ll give them gladly.

* Finally a small question. Does somebody know where I can find good and, preferably :), simple tutorials about how to do and apply textures of this kind?
 

Attachments

  • Arrow_04.txt
    99.9 KB · Views: 198
  • Arrow_03.txt
    99.8 KB · Views: 198
Well, here are new shots, now with the bump map.
 

Attachments

  • Arrow_bump_01.jpg
    Arrow_bump_01.jpg
    73.3 KB · Views: 207
  • Arrow_bump_02.jpg
    Arrow_bump_02.jpg
    81.8 KB · Views: 210
Back
Top