Updated WC3 Excalibur Cinematic Model Print

You can pretty much print anything you can model, with some structural and mechanical considerations for the printing method.

Liquid resin printers are much better at producing high fidelity prints at smaller sizes, and generally produce better models like this, which come out needing almost no clean-up. Filament spool printers like mine are better for large-scale construction, and produce rougher models, but they can print in sturdier materials. I stick with filament printers for a couple reasons, mainly that I don't care for the fumes and curing process of the liquid resin, and that I can make much bigger, rugged prints in ABS, like costume props or the instrument components I'm making for a flight simulator cockpit I'm building.

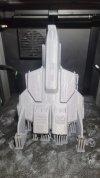
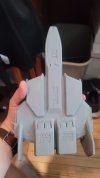
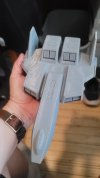
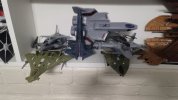
This model started off as something for a game, and I gradually added the details. The model itself was very simple, and all the detail was made with textures. It's come a really long way since.. oh, around 2001. 🤣 Fun fact, the original one on the left is about 1,300 polygons, while the printing model clocks in at about 101,000.
View attachment 13416

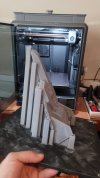
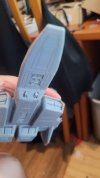
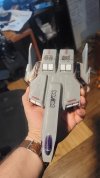
One thing I did do was add a bunch of manual support structures to help the print succeed. I did it to preserve the edges on the faces against the build plate, and to give taller parts support as they printed, but that may or may not be necessary based on the capabilities of individual printers. It added significantly to the amount of cleanup, but the supports were very thin, so they didn't use much plastic.
View attachment 13417

I'm working on putting things together into a build package now for anyone here to test if they want. The above image shows my mesh division, and it's a little odd, because I built the model in 3DS Max, and it doesn't have features like a typical manufacturing CAD program, which would allow you to adjust features like panel lines after they're made. It also doesn't allow for easy definition of thickness, so I kept the interior walls of the model (in red) separate from the exterior surfaces (blue) to make them easier to edit. If I distribute this in STL format, that distinction will likely be lost, but it won't stop you from printing the model as shown.

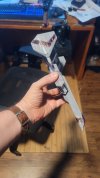
I think the only thing I didn't wind up making was landing gear for it, but it wouldn't be hard to add swappable gear, so I could do it if someone really wants. For the front gear I'd just need to recess the gear bay, and make two plugs, one with closed doors, and one that's open with the extended gear. The rear wheels look like they just pop out of the bottom edge of the lower fins. I think there's a door that opens on the inside of the fins to let a small strut extend inward, and that wouldn't be hard to add since the tails are pretty simple. I could just make a rectangular plug that would swap out a center section of the fin for spread doors and a wheel sticking down.

Anyone who wants to give it a shot, either with a resin or FDM printer at any scale, let me know what you'd prefer, and I can export what you need.

I really want to build up a couple more fighters to print, but I feel like I should learn some actual CAD software to use instead of the insane process I used to build this. All of the panel lines were cut by making panel line meshes, and cutting them directly into the model via boolean operations. I would much rather be able to just let the software automatically engrave the lines into the surface.
That's pretty damn impressive and much more detailed than the ones I printed based on one of the fanmade models flying around. The level of finesse in your Reaper guns and panels is damn good and you don't have the printing errors I have in mine, so kudos!

65CF84FB-93FA-43D5-AC9D-BEC3ACB9361E.jpegFB2A36FE-2256-45C7-848F-B64D04171B0B.jpegE7702ECE-5E91-4671-804F-327D842C0C47.jpeg
 
That's Klav's model, if I recall? His has been the standard model passed around for a long time, always been a good up-detail of the game graphics.

I think his is based more on the in-game model proportions, and using the details from WCIV, since there were several changes made to the ship. The one that always makes me laugh is that I think some of the textures on that version are literally just flipped 180 degrees, specifically the top and bottom of the engine pods. The rest of the textures and markings of that ship were very different from the WCIII version though.

I still wish there was any good source of detail for the reapers though. While the wing tachyon cannons are nice and clear, the guns under the nose have always been blurry blobs with conflicting details from different angles. The only thing I'm fairly sure of is that they have three cylinders visible in the front view, so I ran with that.
 
That is a great model, would love to print it up. I am doing a small collection of 1:72ish Wing Commander craft.
 
I would definitely be down to print this up. My resin is down right now, but my FDM unit is nice and I would do it at 1:72.
 
Will try and get the model parts bundled up and ready to upload in the next day or so, I'm thinking I'll make a raw copy, and one with the support structures I added for FDM printing.

For the main body, the supports may not be necessary for printing, but they give a solid support on any sharp corners. Instead of having the print flake or peel away, they'll let you just cut down the support and file it to a nice edge.

I don't know how well this will print in my original orientation on a slinger bed printer though. I printed everything vertically because my bed raises and lowers, letting the print head draw in he X/Y plane. It might require some reorientation of parts to get a good print.

The supports on the tiny gun parts are pretty important though, and for an FDM printer, I'd recommend printing multiples of them at once spread out over the print bed, or print them at the same time as you print other taller parts. They're small enough that if you don't give the layers time to cool, they will quickly collapse into molten blobs.
 
Last edited:
Here we go folks, I've attached an archive of the model files as a first test run. The files are all in .OBJ format for the moment, so they can be loaded and edited more easily, since the parts are made up of multiple sections. My printer is a few years old, and I do not believe any slicer I have tried had trouble loading .OBJ files, so they should work, but let me know if they can't be loaded in any software. STL files are just a pain to work with, since they're just raw geometry with no groupings.

Archive password is "WC_CIC" which I only added as a measure to drive traffic here if the file gets picked up and starts floating around the web. I'm going to remove the file from this post at the end of this calendar year, so you have about two months to grab it and test the prints for yourself. This is the first print file I've tried to share, so please post any and all feedback you have about the files, and whether I need to make any serious adjustments to them for printing. :D

A lot of the parts are mirrored, but I included separate left and right copies for simplicity. The engine nozzles and engine vent covers are the same for both sides, and need two copies made of each. I'll make some print/assembly instructions and diagrams in the future, but I figure anyone here should have a vague idea of how things fit together. I've also added the display stand into the files, separated into a couple of sections in case you feel like either painting it, or printing the Confed emblem in-color.

For the cannons, I have included two levels of detail for the wing cannons (tachyon guns), and three for the belly cannons (reaper cannons). As mentioned above, I would recommend printing them with other larger parts, or printing batches of them all at once so you can select the best ones, because they are fairly fragile, and prone to either breaking, or turning into blobs while printing depending on the printer's cooling properties.

Anywho, have at it, and let me know how it goes.👍

Edit: I just realized I didn't include the mold I made for the clear canopy, but I'll add that, and a version for printing in clear resin in an update, since I know I've seen that done. The current canopy part is just meant to be a press-fit cover.
 

Attachments

  • CG_Excalibur_Files.zip
    3.7 MB · Views: 15
Last edited:
Holy cow, good luck! That's got to be a long one.

Assuming you're printing all the pieces out to assemble, not the whole ship at once?
 
Last edited:
Fresh out of the K1Max.
The Reapers may have taken some damage.
 

Attachments

  • 20231114_163605.jpg
    20231114_163605.jpg
    115.1 KB · Views: 18
  • 20231114_163617.jpg
    20231114_163617.jpg
    77.5 KB · Views: 16
  • 20231114_163821.jpg
    20231114_163821.jpg
    47.9 KB · Views: 17
  • 20231114_163824.jpg
    20231114_163824.jpg
    48.3 KB · Views: 17
  • 20231114_163829.jpg
    20231114_163829.jpg
    63.8 KB · Views: 24
Ok, wow that's insanely fast. Beautiful! I was wondering whether it would fit at full size. What layer height did you wind up using?

Pity the guns snapped off, but should be relatively simple to drill out the cavities and print new ones to install.
 
I may do a reprint in the future. And yes fixing the guns should be no problem. I'll also redo the canopy at some point cut off the solid one and put on a clear one once my resin printer is back up and running.
 

Attachments

  • 20231115_172341.jpg
    20231115_172341.jpg
    1.3 MB · Views: 20
  • 20231115_172344.jpg
    20231115_172344.jpg
    1.1 MB · Views: 17
  • 20231115_172348.jpg
    20231115_172348.jpg
    1.1 MB · Views: 12
  • 20231115_172353.jpg
    20231115_172353.jpg
    1.2 MB · Views: 15
  • 20231115_172433.jpg
    20231115_172433.jpg
    2.4 MB · Views: 19
Looks pretty good, I'm glad the details came out as clearly as they did.

Let me know if you need any specific combination of parts for a reprint. I don't know how handy you are with CAD software, but Blender opens the .OBJ files just fine for either editing, or just re-exporting specific groupings of parts.

Reminds me though, I need to go back in and properly name many of the parts to make them easier to identify in the layer list.
 
Last edited:
It does! Either three or four.

That's from the Rachel conversation on the flight deck after Freya 1. Might be a higher res version of the rendering somewhere!
 
I got to thinking about this a little more and I'm changing my mind and going with twin barrels.

In the original concept model I think we're only seeing one 'side' of them:

Take a look at this hero render used for the play guide:


And a little better resolution in grescale for the official guide:


... and then I remembered there's a WC TCTG card where they break them out and show the individual guns!

 
So, I wouldn't trust that TCTG image at all, since it's pointing into the wrong place entirely. 🤣

My main reason for going with three barrels is actually the front view.
ss (2023-11-28 at 12.09.28).jpg

Edited the brightness and contrast, and while you can't see the same highlight on the underside of a third barrel (makes sense, it's in the shadow of the lower barrel), you can definitely see the dark circle of the interior.

It's also possible that they're dual barrels, but not leveled? The weirdness is that the renders seem to always show them looking identical even when you should be seeing different shaped arrangements of them.

Also did a blow-up and enhance of the cutscene bit, I've outlined what I think are the six distinct barrels visible in that shot.
ss (2023-11-28 at 12.48.09).jpg

I'd love more clear renders, but it's definitely the triangular nature of the far gun's silhouette that makes me think these are tri-barreled cannons.

What's kind of funny to think about.. a lot of the guns in Star Citizen follow this same sort of design, with multiple barrels designed to generate rapid shots. I did wonder if the Reapers were more meant to be like a classic "tuning fork" gun though, possibly firing from the center of the three barrels like an accelerator of some kind.
 
Last edited:
I will agree with @Chronocidal Guy that they are more likely a 3 barreled rotary type cannon. Now, whether it actually rotates or not is debatable, but given that it is suppossed to be an enhanced ion cannon with a higher refire rate and lower power usage. Given that it was also suppossed be more expensive, a compact tri-barrelled design makes sense. A rotary cannon could also work if it employs a single primary exciter with three seperate, rotating, accelerator barrels when one considers that the magnetic accelerators will likely be the most power consuming, especially their for cooling systems. Rotating the barrels would allow them some limited time to cool between shots, though the effectiveness of that is space is limited unless there is a slipring providing coolant to the barrels as they cycle.
To that end, the imagery indicates 3 barrel to me with a central spar for support, and probably coolant and power routing. A fixed or twin rotary is also not commonly seen for a variety of real world reasons. Russia is one of the few countries I can think of off the top of my head to use a twin barreled aviation cannon, and the cannon, is know for jamming for a variety of reasons.
Then there is just the rule of cool, 3 barreled rotary cannons just look awesome.
 
Back
Top