Slide Show: Difference between revisions
Bandit LOAF (talk | contribs) |
Bandit LOAF (talk | contribs) |
||
| (6 intermediate revisions by the same user not shown) | |||
| Line 15: | Line 15: | ||
Slide Show takes static bitmapped images (*.bmp files) and dis- plays them in sequence. By selecting which images are dis- played, for how long and in what order. | Slide Show takes static bitmapped images (*.bmp files) and dis- plays them in sequence. By selecting which images are dis- played, for how long and in what order. | ||
Slide Show allows you to create your own unique modules from those images already on your machine and from the images in the ORIGIN FX package. | Slide Show allows you to create your own unique modules from those images already on your machine and from the images in the ''ORIGIN FX'' package. | ||
The images in a Slide Show do not have to come from one directory; each picture in a Slide Show may have its own unique path. To use “Slide Show”, check the “Slide Show” box at the top right of the “Select Saver” screen and it will bring up the dialogue box pictured above. | The images in a Slide Show do not have to come from one directory; each picture in a Slide Show may have its own unique path. To use “Slide Show”, check the “Slide Show” box at the top right of the “Select Saver” screen and it will bring up the dialogue box pictured above. | ||
| Line 29: | Line 29: | ||
The “Available Bitmaps” drop box lists all *.bmp files in the directory currently specified in “Change Path:”. Whether you are creating a new show or editing an existing presentation, clicking on a file in this list, and then on “Add to List”, will add it to your slide show in the order selected. A highlighted file will remain select- ed unless specifically deselected. To increase the number of bitmaps available to you, we have included two of our own. To view these, use “Change Path” to go to the \ORIGINFX directory and add the *.bmp files to a slide show. | The “Available Bitmaps” drop box lists all *.bmp files in the directory currently specified in “Change Path:”. Whether you are creating a new show or editing an existing presentation, clicking on a file in this list, and then on “Add to List”, will add it to your slide show in the order selected. A highlighted file will remain select- ed unless specifically deselected. To increase the number of bitmaps available to you, we have included two of our own. To view these, use “Change Path” to go to the \ORIGINFX directory and add the *.bmp files to a slide show. | ||
Designate your ORIGIN FX directory in “Change Path:”, and these pictures of an Atlantean landscape will appear as available slides, if you wish to add these to a Slide Show of *.bmp files from another directory, don’t worry. Remember that each picture in a Slide Show may have its own unique path. There is never a need to transfer art between directories. | Designate your ''ORIGIN FX'' directory in “Change Path:”, and these pictures of an Atlantean landscape will appear as available slides, if you wish to add these to a Slide Show of *.bmp files from another directory, don’t worry. Remember that each picture in a Slide Show may have its own unique path. There is never a need to transfer art between directories. | ||
'''Select All and Deselect All''' | '''Select All and Deselect All''' | ||
| Line 51: | Line 51: | ||
'''Grab FX''' | '''Grab FX''' | ||
It is easy to include screen shots from our movies in your Slide Show. The first step is to run the module from which you wish to take screen shots, and hit to capture any frame that will make a good picture. Even if you have selected “Any Key Press” as a disengage option (see Disengage Options, above), hitting during a module will not return you to your application. These images are then stored in your Windows directory and numbered. The first time you capture a screen it will be titled “GRABFX_l.bmp”, the next “GRABFX_2.bmp” and so on. To add a captured image to your Slide Show, select the desired .bmp file and use the “Add to List” button to include it in your show. You may | It is easy to include screen shots from our movies in your Slide Show. The first step is to run the module from which you wish to take screen shots, and hit to capture any frame that will make a good picture. Even if you have selected “Any Key Press” as a disengage option (see ''Disengage Options'', above), hitting during a module will not return you to your application. These images are then stored in your ''Windows'' directory and numbered. The first time you capture a screen it will be titled “GRABFX_l.bmp”, the next “GRABFX_2.bmp” and so on. To add a captured image to your Slide Show, select the desired .bmp file and use the “Add to List” button to include it in your show. You may also use these images as ''Windows'' wallpaper. The GrabFX files will appear as options in the “Desktop” setup dialogue box, where you choose your wallpaper. | ||
'''Duration''' | '''Duration''' | ||
| Line 64: | Line 64: | ||
OriginFXManual_0009.jpg | OriginFXManual_0009.jpg | ||
OriginFXManual_0010.jpg | OriginFXManual_0010.jpg | ||
</gallery> | </gallery> | ||
| Line 110: | Line 69: | ||
<gallery> | <gallery> | ||
Origin FX - | Origin FX - Slide Show - Menu.png | ||
Origin FX - Slide Show - Options.png | |||
Origin FX - | |||
</gallery> | </gallery> | ||
== | ==Included Bitmaps== | ||
<gallery> | <gallery> | ||
ASTEROID.png | |||
ATLAN1.png | |||
PRIVATER.png | |||
SERPENT.png | |||
STRIKE.png | |||
UW2.png | |||
</gallery> | </gallery> | ||
{{Navbox Origin FX Movies}} | {{Navbox Origin FX Movies}} | ||
Latest revision as of 17:01, 21 March 2023
| Slide Show | |
|---|---|

| |
| Sound | No |
| Music | No |
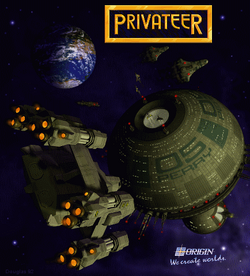
Slide Show is an Origin FX feature which displays a rotation of up to 40 user-defined BITMAP files. Slide Show allows you to store multiple scripts of BITMAPS. Origin FX shipped with several sample bitmaps included two renders from the upcoming Wing Commander Privateer. The demo version of Origin FX includes slide show with a preset 'Coming Attractions' slideshow that rotates between the key art of Wing Commander Privateer and Ultima VII Part Two.
Origin FX Owner's Manual
SLIDE SHOW
Slide Show takes static bitmapped images (*.bmp files) and dis- plays them in sequence. By selecting which images are dis- played, for how long and in what order.
Slide Show allows you to create your own unique modules from those images already on your machine and from the images in the ORIGIN FX package.
The images in a Slide Show do not have to come from one directory; each picture in a Slide Show may have its own unique path. To use “Slide Show”, check the “Slide Show” box at the top right of the “Select Saver” screen and it will bring up the dialogue box pictured above.
New
To create a new Slide Show, first select “New”, then name your new Slide Show file. At this point you are ready to select the bitmapped images that will make up your Slide Show. You may select as few as one or as many as forty bitmaps for any Slide Show. Select slides from the “Available Bitmaps” drop box. Unless you specify that they be displayed in random order, the Slide Show will play them in the order you select.
Once you have created a Slide Show, there’s no need to stop. Create several, each with its own theme, each distinctly yours. And each Slide Show is as easy to edit as it was to create (see below). Don’t forget to name each one.
Available Bitmaps, Add to List and Change Path
The “Available Bitmaps” drop box lists all *.bmp files in the directory currently specified in “Change Path:”. Whether you are creating a new show or editing an existing presentation, clicking on a file in this list, and then on “Add to List”, will add it to your slide show in the order selected. A highlighted file will remain select- ed unless specifically deselected. To increase the number of bitmaps available to you, we have included two of our own. To view these, use “Change Path” to go to the \ORIGINFX directory and add the *.bmp files to a slide show.
Designate your ORIGIN FX directory in “Change Path:”, and these pictures of an Atlantean landscape will appear as available slides, if you wish to add these to a Slide Show of *.bmp files from another directory, don’t worry. Remember that each picture in a Slide Show may have its own unique path. There is never a need to transfer art between directories.
Select All and Deselect All
These two are actually the same toggle button. If you have any bitmaps selected under “Available Bitmaps”, this will be a “Deselect All” button. If no bitmaps are currently selected, this will be a “Select All” button.
Use “Select AH” to highlight your entire list of bitmaps and import them all into a slide show. Use the “Deselect AH” button to deselect all bitmaps highlighted under “Available Bitmaps”. (If you want to Select AH after you have already selected one or more individually, press “Deselect AH”, then “Select AH”.)
Display Order
Your bitmapped slides can be displayed either randomly or in a sequential order. If you choose a sequential Slide Show, you will probably want to arrange your slides in a particular order.
Up and Down
To change the order in a Slide List, highlight the slide you wish to move and use the “Up” or “Down” button to move it earlier or later in your Slide Show.
Cut
If you want to remove a slide from a Slide Show, highlight it in the Slide List, then press “Cut”.
Grab FX
It is easy to include screen shots from our movies in your Slide Show. The first step is to run the module from which you wish to take screen shots, and hit to capture any frame that will make a good picture. Even if you have selected “Any Key Press” as a disengage option (see Disengage Options, above), hitting during a module will not return you to your application. These images are then stored in your Windows directory and numbered. The first time you capture a screen it will be titled “GRABFX_l.bmp”, the next “GRABFX_2.bmp” and so on. To add a captured image to your Slide Show, select the desired .bmp file and use the “Add to List” button to include it in your show. You may also use these images as Windows wallpaper. The GrabFX files will appear as options in the “Desktop” setup dialogue box, where you choose your wallpaper.
Duration
“Duration” refers to the amount of time, in seconds, that each slide is displayed before going on to the next. Adjust the duration using the up or down arrow to raise or decrease the number of minutes and seconds. This process must be repeated for each slide added to the list. Thus, each image can have a different display duration, all in Just one show.
Edit
Once you’ve created a Slide Show, you can change it. Select the title of the show you wish to change, then click on “Edit”. This allows you to change the order of slides, remove or add slides and change any of the durations you choose. Take this opportunity to optimize your completed Slide Show.


