Who can help? - So many Blender questions ...

NightBall06

2nd Lieutenant
Hey Guys,
well since my Hellcat is now finished (by appearence) and my final goal is to make little movies like Howard Days Star Wars Minis...
I was wondering if some of you would be so kind to answer my many Blender questions in order for me to a) get better b) get to my selfproclaimed goal.
It would be really nice of you. - And if you have any tutorials fitting to my questions, I'd be happy to watch them...

So here are my first questions:
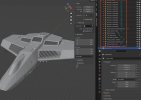
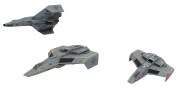
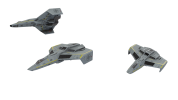
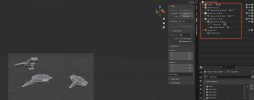
1) What are the next steps? - How to get to a 1 part, 1 texture model?
If I look at my model now, it consists of +50 parts (Wings, Canopy, Fuselage, etc.) with different textures each... How do I get from here to that 1 part model with 1 or 2 textures like Klavs is offering?
2) How do i "bake" my textures to my model? - Is that even the right step towards animation? ... As I said: Klavs old models for example mostly had 1 texture file ... How do I get there?
3) Does anyone know how to work "Quad Remesher" right? - I have been trying to get the Fuselage right, but I never get a good result - While the cockpit is easy, the intakes too...

I really hope, that some of you are willing to answer my questions... 3D is, and because time consuming, will always be a hobby for me. But I am willing to learn :)
So thank you in advance
 

Attachments

  • SCR-20240324-saic.jpeg
    SCR-20240324-saic.jpeg
    870.9 KB · Views: 7
  • SCR-20240324-saxf.png
    SCR-20240324-saxf.png
    354.2 KB · Views: 8
I'm not familiar with Blender (only 3ds max), but the 1 model 1 texture approach isn't necessary at all imo.
You do such things if you want to 3d print the model, so there are no holes in it and the model is a closed hull.

In 3ds max (and pretty sure also in Blender) there is something called xrefs, where you can reference an entire external file into a scene.
So for your movie I would try finding the xref feature in Blender. Then create a separate and simple scene with camera, light and a dummy object. The dummy object should be set invisible when rendering, which is used as the attachment point for the xref. (link the xref to the dummy)
Then you can animate the dummy (rotate, move, travel along a bspline), figure out the timings etc and once you hit render, the ship model will replace the dummy in your scene.
By temporarily disabling the model/xref, the dummy will also help to find quickly the right camera movements/timings without having to wait long for the render of a complex ship model in a photo realistic lighting and high resolution (e.g. when a final frame takes 30 seconds or longer to render, reducing that to half a second for quick tests is worth it).
 
Last edited:
I'm not familiar with Blender (only 3ds max), but the 1 model 1 texture approach isn't necessary at all imo.
You do such things if you want to 3d print the model, so there are no holes in it and the model is a closed hull.

In 3ds max (and pretty sure also in Blender) there is something called xrefs, where you can reference an entire external file into a scene.
So for your movie I would try finding the xref feature in Blender. Then create a separate and simple scene with camera, light and a dummy object. The dummy object should be set invisible when rendering, which is used as the attachment point for the xref. (link the xref to the dummy)
Then you can animate the dummy (rotate, move, travel along a bspline), figure out the timings etc and once you hit render, the ship model will replace the dummy in your scene.
By temporarily disabling the model/xref, the dummy will also help to find quickly the right camera movements/timings without having to wait long for the render of a complex ship model in a photo realistic lighting and high resolution (e.g. when a final frame takes 30 seconds or longer to render, reducing that to half a second for quick tests is worth it).
Thank you very much for your response. To be honest I've never heard of "xrefs" by I will definitely look it up now :)
 
I do have some more questions though':
I am trying to render a scene with 3 Hellcats from 3 different squadrons (Blue/Red/Gold)... So I thought: If I duplicate my model twice and then give one of them the red color textures, while the other one the blue ones - Then I can render the scene...
BUT - Whenever I change the color textures for one of those ships ... Blender is changing the Color also for the other two ships - even if I explicetly choose different.
Why is that? - How can I change it?
Thank you in advance.
 

Attachments

  • Hellcat_VI_test_render_Mix.png
    Hellcat_VI_test_render_Mix.png
    985.6 KB · Views: 15
  • Hellcat_VI_test_render_Gold.png
    Hellcat_VI_test_render_Gold.png
    764.7 KB · Views: 11
  • SCR-20240324-tshd.jpeg
    SCR-20240324-tshd.jpeg
    613.3 KB · Views: 11
In blender dummies are called empties. I recommend using the arrows so you have an XYZ reference. For ships learn how to animate along paths or curves, that will give you the most natural motion
 
I do have some more questions though':
I am trying to render a scene with 3 Hellcats from 3 different squadrons (Blue/Red/Gold)... So I thought: If I duplicate my model twice and then give one of them the red color textures, while the other one the blue ones - Then I can render the scene...
BUT - Whenever I change the color textures for one of those ships ... Blender is changing the Color also for the other two ships - even if I explicetly choose different.
Why is that? - How can I change it?
Thank you in advance.
You need to create new materials for each color. The materials are referenced by the scene/world, not the model
 
In blender dummies are called empties. I recommend using the arrows so you have an XYZ reference. For ships learn how to animate along paths or curves, that will give you the most natural motion
What arrows? - Do you mean Klavs' Arrows? ... sadly I don't have that particular model - although I've been looking for it quite some time. Do you have it ?
 
You need to create new materials for each color. The materials are referenced by the scene/world, not the model
Could you please elaborate a bit more? I have different materials for each color - I have different Fuselage BaseColor/Metallic/Roughness/Normals as well as different Wings BaseColor/Metallic/Roughness/Normals... I even tried giving each a seperate Texture folder but that also didn't work... What am I missing?
 
Are you sure the ships are copies and not instances/references of each other? (again speaking in 3ds max terms)
Like you have one master model and the other 2 are instances/references of it, then each change on one of them, would also change the other 2.
Should be easy to find out if you slightly deform (e.g. extrude a polygon) one model and the deformation also happens on the other 2.
 
What arrows? - Do you mean Klavs' Arrows? ... sadly I don't have that particular model - although I've been looking for it quite some time. Do you have it ?
No when you add an empty there are several options om how you want the empty to appear in the world space in Blender. I was reccomending using the "arrows" option because it represents the axes.
 
Could you please elaborate a bit more? I have different materials for each color - I have different Fuselage BaseColor/Metallic/Roughness/Normals as well as different Wings BaseColor/Metallic/Roughness/Normals... I even tried giving each a seperate Texture folder but that also didn't work... What am I missing?
Ok so for example: If I have a material named "red" and i make the rgb value red as well, and apply that material to two different meshes. If I go in and change the RGB value to green, it will change the rgb value of the material named "red" for all the instances of "red" in the scene. So if I want to make one model with the faces applied to "red" a different color, the I need to go to that one model that I want green, create a new material named "green", then select all the faces on that model that use the material "red" and apply the material "green".

If I understand your problem correctly, that should help. Alternatively if you want to PM me the .blend file, I can take a look.
 
Back
Top